News Category
Archive
Newly Posted
Check list (4 steps) to focus properly
Posted 11/15/2021
When you shoot I’m sure almost everyone has asked yourself if you have done everything correctly so the scope will focus properly. Some of you may be aware, but actually there are 4 steps that need to be checked. Please refer to the check list below and I hope that you’ll be able to acquire an even sharper image with your scope!
☑ (1) Adjust the eyepiece to the proper diopter setting
The reason why you adjust the eyepiece is to set the right diopter value which differs by person and thus to see the “RETICLE” clearly and crisply. You can adjust the eyepiece before or after you mount it on your rifle, but we recommend that you do this before mounting so you can see the nearby wall or a blank sheet easier.
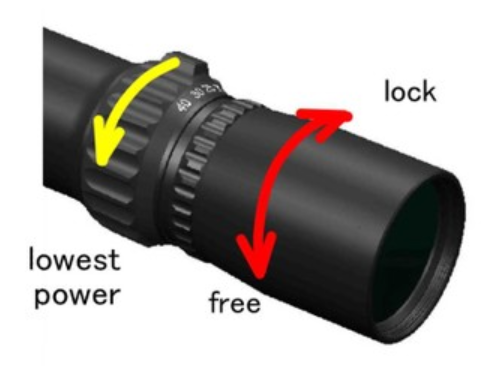
1. Rotate the body of eyepiece counter-clockwise until the eyepiece knurled locking knob moves freely.
2. Please set the side focus to infinity.
3. Please set at the lowest magnification setting. At lower magnification of the scope, there is more light coming in on the reticle surface. The human eye can focus more clearly when it is bright.
4. Look at a white featureless wall, a blank sheet of paper preferably at a distance of 4-8 inch (about 10-20 cm).
5. The diopter setting can be adjusted from – 2 to +2. If you are near-sighted, rotate the eyepiece body in the – direction, counter-clockwise. If you are far-sighted, rotate the eyepiece body in the + direction, clockwise. If you have prescription glasses and will be wearing them while shooting, we recommend that you adjust the eyepiece while wearing them.
6. Do not stare at the reticle for more than a few seconds while adjusting, take many quick looks as you adjust until you get the best, crispest view of the reticle.
7. When the reticle is focused for your vision, rotate the knurled locking ring counter -clockwise until it meets up with the eyepiece body to lock. Once the eyepiece is set at the best position of your vision, please do not alter the setting unless your visual acuity changes.
You can read more detailed information HERE.
☑ (2) Mounting position of the rings
If the rings are close to the curve of the scope, it will restrict the inner parts from moving. Rings should be placed in the red zone.

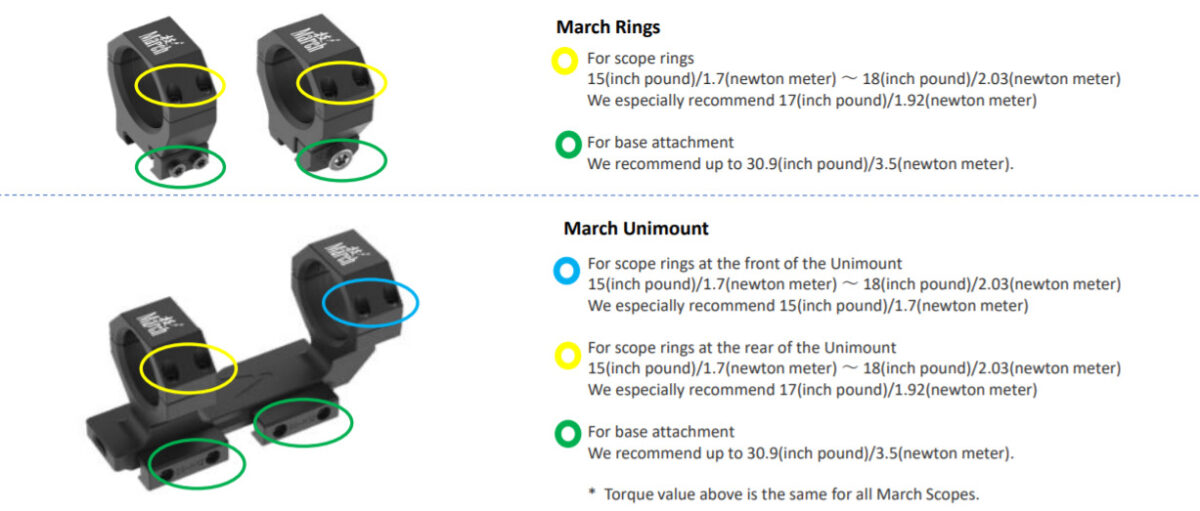
☑ (3) Torque value of the rings
If the rings are over tightened, they may prevent the inner moving part of the scope from moving smoothly. If the inner part can’t move you will not be able to focus properly. Therefore please make sure to follow the recommended torque value. (* The value differs according to the version of the March rings manufactured by March Scopes UK. If there is a change to the rings, we will update the recommended value on our website.)
You can see the PDF (based on the value as of today) from HERE.
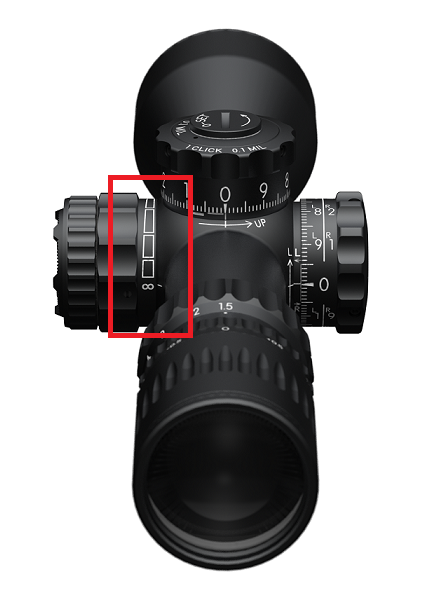
☑ (4) Adjust the side focus
The aim for adjusting the side focus is to see the “TARGET” clearly. (You would need to adjust the diopter setting to see the reticle clearly as explained in (1).)
1. Please set at the highest magnification setting. (*Note2 below)
2. Adjust the side focus where you can see the target clearly.
3. Once you think you have adjusted correctly, please look through the scope and move your head around. When the target image and the reticle do not match depending on the position of the eyes, the target and the reticle are misaligned. This is called parallax when the target image does not focus on the reticle position. If there is a parallax, please readjust the side focus and if it still doesn’t work readjust the diopter and then the side focus.
You can read more information HERE.
(Note 1) The markings on the side focus indicates the direction of rotation. As each person’s diopter setting is different, side focus will be set at different points for each shooter. That is why there are no numbers on the side focus. For some lower power scopes, you can focus nearer than 10yard.
(Note 2) Depth of focus refers to the range over which the image plane can be moved and still retain its sharpness. In general, the smaller the objective lens diameter is, and the lower the magnification you use, the larger the depth of focus. At lower power focal depth becomes deep and it comes into focus at a wide range from the front of the target to beyond. Therefore, when you zoom in at higher power the focal point may shift and the image may blur. On the other hand, at the highest power focal depth is shallow and it comes into focus at a narrow range. When you decrease the magnification, the focal point will not shift and the image will not blur.
Now you are all set! We hope you enjoy shooting:)
Written by : Mari Morita
